Monday, January 27, 2014

how to make green chef salad recipe

How to make a salad bar at home
By: Chef Cristian Feher
www.tampabaychef.com

My own personal salad bar!
Having your own personal salad bar at home has its perks - primarily, you'll actually eat salad!

My family's first choice of food at home is not salad - but put us in a restaurant with a salad bar, and watch us go to town! The difference? Variety. It's the spice of life, and it's a selling point to salad. So, I decided to make our own salad bar at home. And guess what? Everyone has been eating salad!

Try this at home and maybe your family will eat more salad too.

Before I get to the recipes and descriptions, I'm just going to give you a few pointers on making healthy salads, since the whole point of a salad is to provide your body with vitamins, minerals, and nutrients - not just sugar and water disguised in the shape of salad - you can watch this video here to see what I mean.  How to make a healthy salad video

  • Use dark greens like baby spinach, baby kale, and dark organic salad mix to maximize enzymes, vitamins, and minerals. 
  • Avoid light colored lettuces like iceberg, and romaine, which don't really have any nutritional value.
  • Avoid store-bought salad dressings that are filled with sugar, high-fructose corn syrup, preservatives, and all sorts of crap that defeat the purpose of eating a salad in the first place.
  • Make your own salad dressing - it's easy! And it's healthy. 
  • Buy organic vegetables to avoid pesticides and chemicals. But conventional veggies are still MUCH better than not having a salad at all, if that's what you can afford.
  • Use different colored vegetables to liven up the salad visually (stimulating your appetite), and to pack it with nutrients. 
Alright, having said all that, here are the loose recipes from my personal salad bar. It may probably take you a couple of hours to prep. But you'll have fresh, interesting salads all week long! And if you replace at least one meal a day with a healthy green salad, you'll notice the difference in how your body feels right away.

Sour Cream Salad Dressing  This is one of my favorite salad dressings. For this one, you will need a food processor, or at least a hand-blender to mix all the ingredients together. Put the following ingredients in the food processor and process until smooth:
  • 8oz sour cream
  • 1 cucumber, peeled and diced
  • 4 cloves of garlic
  • 1/4 cup fresh parsley
  • 2 tbsp of white vinegar
  • 3 tbsp of olive oil
  • Salt and pepper to taste
Sliced Cucumbers will keep in a plastic container filled up with cold water and 3 tbsp of white vinegar. Shake off the excess water when you're ready to put on the salad.

Shredded Beets are a great way to add nutrition, natural carbohydrates and color. I used a spiral slicer to make beet strands. You can use a vegetable shredder or cheese grater if you don't have a spiral slicer.

Shredded Red Cabbage is easy to make with a food processor. Cut the cabbage into wedges that you can fit down the chute of the food processor. Put the shredding wheel on the processor and shred away! You can do it with a cheese grater, or you can just slice it really thin with a chef's knife if that's all you have.  Add a little salt, and a few splashes of vinegar to the mixture to keep longer, and to soften the cabbage.

Shredded Carrots are full of vitamins, minerals and low-glycemic carbohydrates. You can shred them with a cheese grater, or with the food processor like I did.

Pickled Radishes and Red Onions are really easy to make. I buy pre-shredded radishes, combine that with sliced onions in a container and add the brine. To make the brine, I used 1 cup of white vinegar, 2 cups of water, and 1/2 cup of sugar. I warmed it on the stove just enough to melt the sugar into the liquid. You can then, pour the liquid into the container with the vegetables and refrigerate over night. The result is tangy, crispy, sweet radish and onion! And most of the sugar stays in the brine.

To make Soy Marinated Mushrooms, simply quarter about a dozen large white mushrooms, put them in a pot, splash them with 1/4 cup of Japanese soy sauce, 2 tbsp of Mirin (sweet rice wine), salt and pepper to taste and bring them to a boil. As soon as they boil, take them off the heat and leave them covered for 15 minutes. Transfer the mushrooms to a container and keep the "mushroom juice" in the pot for the next vegetables.

To make Soy Marinated Zucchini, simply slice the zucchini, put them in the pot with the mushroom juice, bring to a boil, take off the heat, cover pot and let them sit in there for 15 minutes. Remove them, put them in a plastic container and leave the "mushroom zucchini juice" in there for the next vegetable!

To make Soy Marinated Green Italian Beans, put fresh or frozen beans in the pot with the mushroom zucchini juice, bring to a boil, take off the heat, cover pot and let them sit in there for 15 minutes. Remove them, put them in a plastic container and you're done. With this leftover "mushroom, zucchini, green bean juice", you can even poach other vegetables if you wish. It will just keep on getting tastier with each new vegetable that you add in there.

To create even more variety and add protein, you can top your salads with:
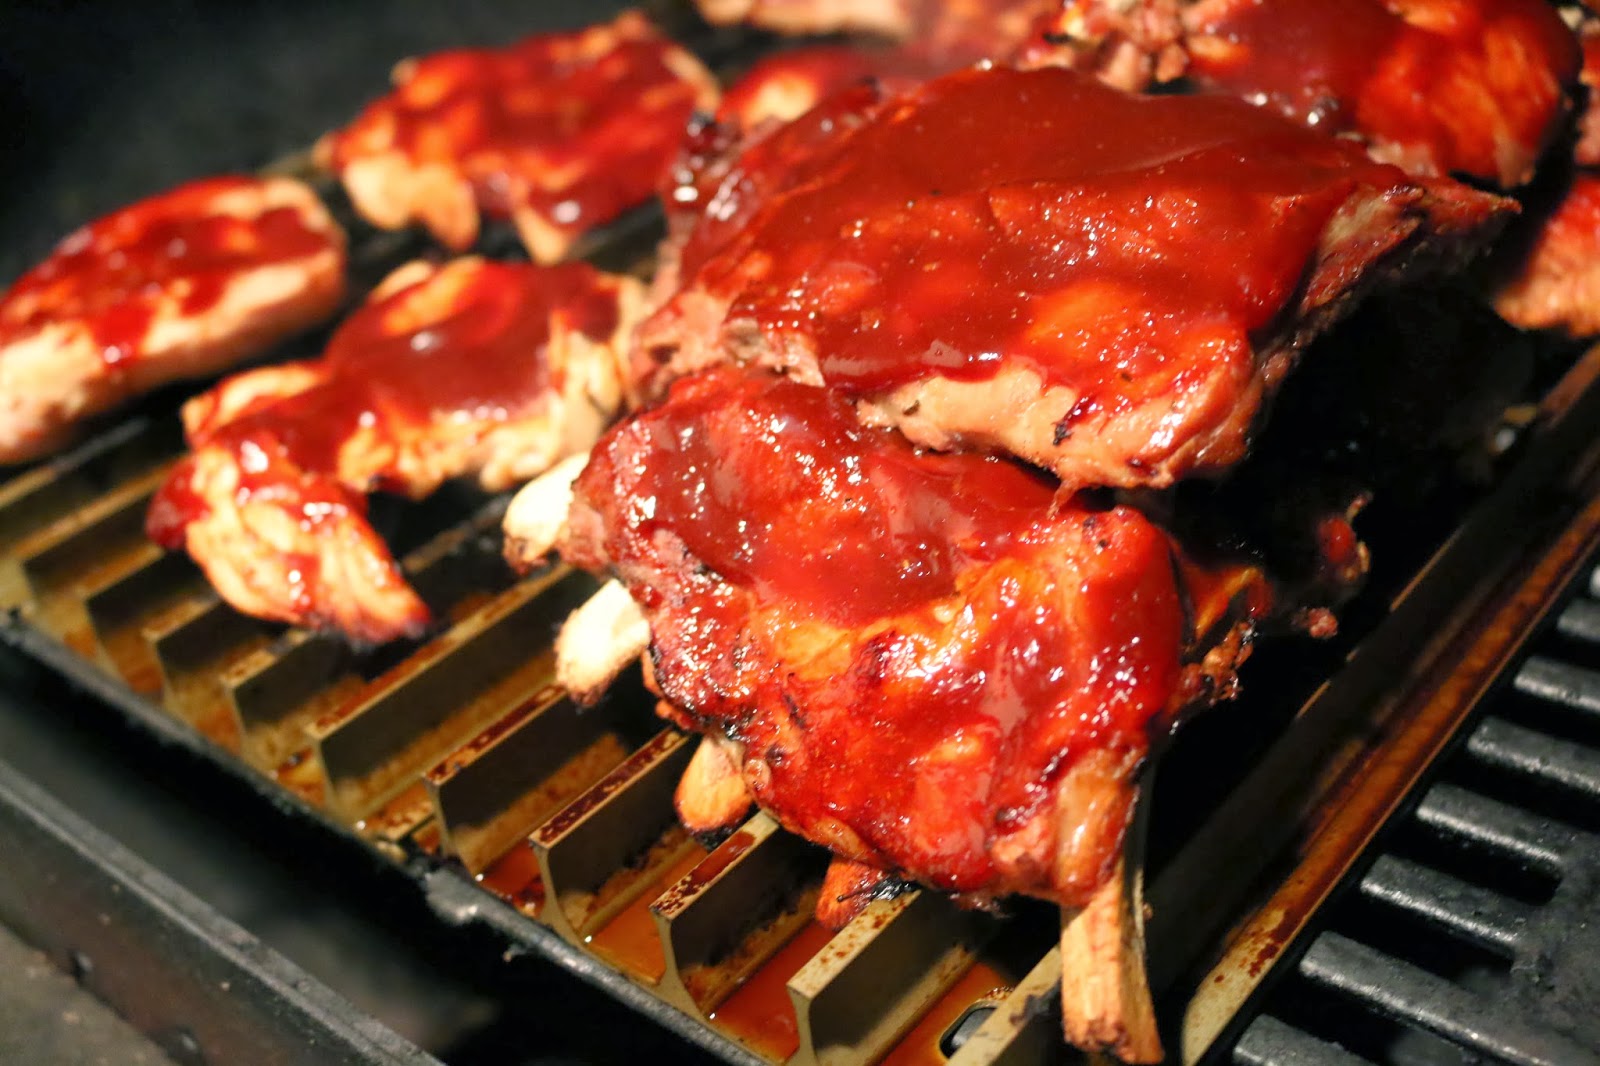
  • Grilled meats like, chicken, beef steaks, pork, turkey, sausages.
  • Cold cuts of all kinds.
  • Sliced cheeses, and creamy cheeses like Boursin.
  • Steamed fish, salmon salad, tuna salad, grilled fish, shrimp, scallops.
  • Smoked almonds, nuts, and dried fruit.
  • Canned fish, and smoked meats are quick, easy and nutritious.

You may think this is a lot of work, but you'll thank yourself after a couple of days of eating really good salads!  You may notice that you're not as tired as you used to be, that you can get more done, and you may even lose weight. But the point of this for us, was not weight loss (although it will likely happen), it was to add a tonne of nutrition to our diet. Add to this, our morning green smoothies, and we've been flying every day!

I love that I can add all sorts of grilled meats and seafood to this - being a guy, and a chef, a juicy rib eye steak, butter grilled chicken thigh, or bacon-wrapped scallop, really makes me look forward to eating a nice colorful salad for dinner.  And now that I have my GrillGrate grill grates, I've been grilling everything!

My wife and I work-out three to four days a week (since December), and I've noticed how much more energy I've had during our last two workouts - all due to the salads and clean proteins. Well, I'll stop trying to sell you on this personal salad buffet. But you know, me, when I find something I really enjoy, I like to share it with you!


Tuesday, January 21, 2014

Best replacement grill grates for BBQ grill

Pimp My Grill!
By: Chef Cristian Feher
www.tampabaychef.com

GrillGrate grill grates over existing cast iron grates.

Perfectly cooked chicken and ribs! Notice the fat held in the channels.
For many of us, the term "grilling out" brings a smile to our faces. What's better than fresh air, good food, and getting back to our primal way of cooking?  Well, for one, doing it with less flare-ups and less fuel.

Whether you are looking to replace your existing BBQ grill, or would like a way to "Soup it Up!", I have a great recommendation for you!

A few years ago, my wife got me a dual grill - one side charcoal, and the other side propane. I fell in love with this grill righ away. I even coined a name for it, I call it the mullet grill (business in the front, party in the back!) If I'm short on time, I use the propane portion of the grill, and if I have time, I can spend a few hours making a smokey and delicious BBQ using the charcoal side.

I noticed this winter that the grates (made of cast iron) had started to rust. And the replacement grates were priced too steep to make it a worthwhile replacement. So, in considering getting rid of this grill altogether, I happened to come across www.GrillGrate.com This company makes grill grates that fit over your existing grates. Not only can you use these to replace your existing grates, but you can also take these easily from grill to grill, ensuring that they will stay with you for a long time - I like products with this type of versatility. That was my first selling point.

The other selling points of these hard anodized aluminum grates were a claim that they amplify the heat source (turning your grill into an infrared grill), allow you to use less fuel to create the same heat, have a really long life, resist corrosion, and prevent flare-ups (something everyone has to deal with when grilling out).

I received the grates two days after ordering them online. Excited to try them, I rushed out to fill my propane tank which had been sitting idle for a few weeks - I just didn't want to use the rusty grates anymore, and although I had done my best to cure them, they still rusted. But, back to the new grates - I made a raspberry balsamic BBQ sauce, picked up chicken and baby back ribs, and put these grates to the test using the propane side of the grill.

The results were as advertised:
  • I grilled with all three burners on med-low (with the old grates, I used to light one burner on high, and grill the food over the two "off" burners to keep it from burning). I can now use the entire grill surface, at an even heat without burning a lot of fuel.
  • My favorite aspect of using these were ZERO FLARE-UPS! The fat from the ribs dripped down into the channels of the grates instead of the burners below. It was a pleasure to grill directly on the flame without flares!
  • Even heat distribution across the entire grill surface.
These grates will probably outlast my BBQ grill, and I look forward to using them on any future grill that I buy - I especially foresee using these on a Traeger wood pellet grill that I've had my eye on. But for now, they have not only allowed me to keep the "Mullet Grill", but have actually improved it from its original function. Grilling season has officially re-opened at the Feher household!

In conclusion, whether your grill grates are falling apart, or you want to have a more enjoyable and efficient grilling experience, I highly recommend the GrillGrate grill grates. I have no affiliation with GrillGrate and have received no compensation for writing this article. When I come across a good product, I like to tell people about it.


Friday, January 3, 2014

7 tips for roasting meats

Roasting Tips
By: Chef Cristian Feher
www.tampabaychef.com

Perfectly Roasted Beef
For the carnivore, there is nothing more satisfying and sought after than a perfectly executed roast. Whether it's beef, lamb, pork, or poultry, doing it right, makes it taste-tastic! Here are seven tips to help you make better roasts.
  1. Always season your roast with salt and pepper. This can be done before, during, or after roasting. But for the most flavor, letting the salt dissolve into the meat before roasting, will yield more flavor.
  2. Roast your meat on a rack. If your meat is fatty, place it fat-side-up. That way the fat melts and runs over, and through the meat, basting it in its own juices. And the fat that is left over, falls to the bottom of the pan below your meat. This way the bottom of your roast is not 'boiling' in the drippings, but roasting uniformly on the rack.
  3. Do not sear. Yes, many chefs sear their roasts before roasting, believing that this will somehow transform the outside of the roast into a water-proof bladder. Searing does not keep in the juices. Your roast will be nicely browned without searing it.
  4. Do not add water. If you roast your meat at a constant temperature, the drippings should not burn. If your temperature cannot be kept constant, you may want to add a little water to the drippings.
  5. Do not cover a roast. Technically, if you cover the pot, your meat will steam, thus you will be making a "pot roast".
  6. Turn a boneless roast once or twice during the roasting process to ensure a more even roast.
  7. Roasting low and slow (325 to 350) will reduce shrinkage and increase flavor, juiciness and tenderness. And, isn't that what roasting is all about?

Saturday, December 14, 2013

How to brew a perfect cup of coffee

What you need to know about coffee
By: Chef Cristian Feher
www.tampabaychef.com

To many people, coffee is the essence of life. Whether you drink it to start your day, to beat that afternoon bout of narcolepsy, or to finish a great meal, coffee is a part of our lives. But what is coffee, and what do you need to know about coffee? What makes good and bad coffee? Here's what you need to know.

Coffee is a stimulant - actually, the caffeine inside coffee is a stimulant. "Yeah? Tell me something I don't know!" You might say.

Well, I mention it because of this fact: Most drugs work the same way (caffeine is a drug). A little bit of drug X has a stimulating effect, but a little more of that same drug X has the effect of a tranquilizer, and an even larger doze of drug X can even kill you. But we're talking about caffeine, so let's just focus on it as an upper and a downer - you're not going to die from drinking coffee.

A little coffee [caffeine] will act as an "upper". It will add itself to your endocrine system and speed you up! But, if you drink too much of it, you will get to a point where that caffeine will actually start acting as a "downer". It will make you even more tired than you were before you started drinking coffee. The amount will vary by your body size and tolerance for caffeine, but it will act this way.

So, that's the first thing you should know. Too much coffee will tranquilize you.

Equipment is important. What you brew your coffee with can be the deciding factor between a good cup, and a bad cup of coffee. You also need to know about time, temperature, and water.

You have to use a CLEAN COFFEE POT. You see, every batch of coffee you make, leaves a layer of oil in the coffee pot. If you don't properly clean out this oil with a degreaser (dish soap), your next batch of coffee will suck. The rancid oil left behind will ruin your next batch. Even a little spot of oily coffee residue can ruin your entire next batch. This is why an instant coffee machine, like a Keurig, is better than a traditional coffee pot. (I am not paid by Keurig and have no promotional relationship with them).

Use fresh coffee. Ground coffee has a limited shelf-life as soon as it's introduced to oxygen. It will only last 2 to 3 weeks before the oils start to go rancid - and that's when it's kept in a cold, dry place with a tight lid. So, either, buy small batches, or grind your own coffee. Again, K-cups (as in Keurig cups) are vacuum sealed to keep the ground coffee fresh right up until you brew it. Your local coffee shop also (probably) grinds their coffee daily.

Use filtered, bottled water. Tap water contains a cocktail of chemicals, resins, bacteria, and even metals that will affect the taste of the coffee. Only a neutral water from a bottle or filter will let your coffee shine through.

Temperature makes the difference. Coffee should be brewed between 195 and 203 degrees F. Above that, and you burn the coffee, making it bitter. Below that, you don't extract the essentials of the bean, and it turns out watery and bland. Again, a Keurig machine, and other high-end coffee makers keep this constant temperature for you while brewing. Or, you can do this yourself with a thermometer and a French-press.

Brewing time should not exceed 8 minutes - after this, you burn your coffee. Letting your coffee sit on a warming plate (as in most office coffee machines) burns the coffee and gives it a nasty taste. You should throw coffee out that is older than an hour - or make iced coffee drinks with it (as McDonalds and other fast food places do).

In keeping all these things in mind, you can now brew a perfect cup of coffee! What you put in it at this point is up to you. Milk, sugar, cream, flavoring agents - these are all good and will vary person-to-person. But the main point is that you know what makes good and bad coffee, and how much of it serves your purpose.


Wednesday, December 4, 2013

How to cook for guests during the holidays

Coping and Cooking for the Holidays

By: Chef Cristian Feher
www.tampabaychef.com


Yes, it's true that the holidays are, indeed, the most wonderful time of the year. Yes, it's the hap-happiest season, with those holiday greeting and gay happy meetings. There'll be parties for hosting, marshmallows for toasting, and caroling out in the snow (or guitar by a palm tree if you live in Florida). But if you're the one in charge of feeding everyone... it can be just plain stressful.

Having fed thousands of spirited, hungry people in my life, here are some tips which will bring a little joy and sanity into your hectic routine of feeding your holiday army! And maybe this year, not only will they sing songs about you, but you won't have to cry into a bottle of wine when it's all over.

1. Hire a personal chef to do it all for you! But, if you'd still rather do it yourself, please proceed to number 2 on the list.

2. How much is too much? Quantities are very important. It can seem like a guessing game when you're trying to figure out how much food you should make. And God forbid, you run out of food! Your mother-in-law will never let you forget it. But don't panic. Just follow these guidelines:
  • Plan to serve 7 pieces of hors d'oeuvres per person if you're going to serve dinner right after. But if it's during the day, and your guests won't be eating a main meal any time soon, plan 10 to 12 hors d'oeuvres per person. If you're not feeding them a main meal at all, make 12 to 14 pieces of hors d'oeuvres per person.
  • Older people tend to eat less than younger people. Teenagers eat like monsters.
  • Prepare 6oz (raw weight) of meat per person.
  • Prepare 1Lb (raw weight) of turkey per person.
  • Prepare 1 chicken breast per person.
  • Prepare 5 to 6oz of seafood (like shrimp, squid, scallop) per person.
  • Each lobster should be about 1.5 to 2 Lbs each.
  • Prepare 8 to 12oz fish fillets per person.
  • Prepare 4oz of potatoes, salad, vegetables, rice, or pasta per person.
3. Timing is everything! So, you've got all your groceries sitting there, and it's time to cook it all. This is the point where most people, not knowing what to cook first, want to run away to China and never look back. After all, dad can re-mary, and the kids can find a new mom, right?

The way to tackle this in a calm and collected fashion is to make a list of all of your food items, and put the estimated cooking time next to each item. For example, it might take you 30 minutes to cook mashed potatoes, 3 hours to roast a turkey, and 1 hour to peel, cut, and cook veggies. So, you just start with the longest time first and work your way down this way:
  • Start with the turkey, because that takes the longest (3 hours)
  • Then, prepare the veggies (1 hour)
  • Then, make the mashed potatoes (30 minutes)
  • Start cooking X plus 1 hour before you serve the meal. X=the time it takes for the longest dish to cook - in this case, it's 3 hours for the turkey. So if dinner is at 6pm, start cooking at 2pm.
  • It helps greatly to prepare all of your ingredients the day before. This means, chopping, dicing, slicing, defrosting, etc.
Once an item is cooked, you can keep it warm by putting a lid on the pot, putting it into a sealed plastic container (which you can microwave when it comes to time to serve), or putting the food into a tin foil pan with lid, which can be thrown in the oven at 400 degrees, 10 minutes before serving to heat it back up.

4. Clean as you go! There is nothing worse than finishing a big cooking session, only to realize that your kitchen is an absolute mess. Every single pot, cutting board, and cooking utensil in your kitchen is now perched on top of each other forming a perilous tower of terror above your sink!  Again, to keep from running away to China, clean as you go. When you're finished using something, clean it, put it on the drying rack, then back where it goes. Trust me, you will be very happy when you're cooking is all done, and your kitchen is actually clean!

5. Don't ask - tell. And while this philosophy can be applied to many aspects of life, I am talking about menu planning. Instead of taking requests from your family and/or guests, YOU decide what the menu is, and you tell THEM. This way you are in control, and you don't volunteer to prepare a menu that, a. you don't know how to make, or b. would take you 15 hours to prepare if you had seven hands! Make your own menu with dishes that YOU know YOU can cook, and dinner will be a success!  The holidays are not a time for experimenting with new dishes or taking requests - especially when you are cooking for a large group of people.

Next time you have a rainy weekend in August, is the perfect time to try out new experimental recipes for the holidays.

I hope these tips will help you to actually enjoy entertaining this holiday season! Merry Christmas, Happy Chanukah, Happy Kwanza, and if you celebrate Festivus, may your feats of strength smite your opponents by the pole!

Tuesday, October 29, 2013

Walking for health and fitness

Walking, the universal solver of problems
By: Chef Cristian Feher
www.tampabaychef.com


I thought about this article while going for a nice walk today.

I was really tired. I had been up since 6am doing maintenance on all my websites, not to mention menu planning for all my customers this week. Needless to say, by 4pm I was feeling pretty tired. So I decided to get some fresh air and go for a nice walk. 30 minutes into the walk, I started to feel pretty good - life started to come back into me. I didn't feel tired anymore. I realized that I hadn't gone for a nice walk in quite a while. And up until recently, walking had been one of my favorite activities.

I started thinking about walking while I was walking. And I could see how walking is the solver of all problems.

If you need to get some place, you can walk there. If you need to get some fresh air, you can go for a walk. If your job sucks, you can walk out. Wrongfully imprisoned? Getting to walk free would feel pretty good. Tired? Don't take a nap. Go for a walk. It will re-energize you. Are you sick? Do you have a headache? Cold or flu? (I've actually done this before with a 50% success rate [I probably didn't walk far enough the other 50% of the time]) walk until you feel better, even if it's a 5 hour walk. Having a fight with your spouse? Go for a walk to cool off. First snow of the year? Perfect time to bundle up and go for a walk. Depressed? Forget pills. Walk - keep walking until you feel better. Turn off your cell phone and just walk.

Walk through a new city. Walk by the house you grew up in. Walk to the store or the bank. Walk on the beach. Walk on a dewy field early in the morning.  Walk in a shopping mall. Walk to a restaurant and work up a hunger. Walk with your kids. Walk your dog. Feeling spicy? Walk through a dangerous part of town - but remember, keep one hand in your pocket, talk to yourself, and look like you own the place.

In 1941 Slawomir Rawicz, a Polish army lieutenant imprisoned in a Siberian POW camp, claims to have walked out. He said, "F this." And simply started walking South through the snowy forests. Since the guards never imagined that anyone could survive in the freezing conditions, they didn't bother to put up walls or fences. He was joined by six inmates, and together, they walked over 4000 miles through the Gobi dessert, Tibet, the Himalayas, and eventually made it to British India in the winter of 1942.

Forest Gump had enough with life and walked for 3 years, 2 months, 14 days and 16 hours.Then he said, "My mama always said you've got to put the past behind you before you can move on." (that's kind of how I remember it, anyways).  Anyone feel like shrimp?

I was once the chef on a wooden tall ship. It was a horrible gig. I hated every second of being on that ship, and to make a long story short, I walked off the ship when it docked in northern Poland in a city called Gdynia. I too, simply walked. I walked along the beach, over bridges, by factories and along train tracks until finding a security check post where the guys were nice enough to call me a taxi to get me to the closest airport. That was one of the nicest walks I've ever taken. It was just me against the world, in a foreign country, with $200 in my pocket, a sweaty chef uniform and my video camera. But I recall how alive I felt. And if I could do it all over again, I would.

When I was in my 20's I went to live in Margarita Island. I smoked cigarettes, ate like a beast, and lost 25 pounds in 10 weeks. I attribute it to the fact that every day I would walk. I would walk to the supermarket, the bank, the beach, and I would hike. I would hike for hours in no particular direction. Mostly just following the coast line. Or I would walk by the banana plantations to the next town. I once walked up along a jagged, rocky shoreline with low-lying cliffs. And as I was shimmying across a rock wall to get to the next path on top of the other rock wall, I looked at the crashing surf and the rocks about 50 feet below me and thought to myself, 'If I fall down there and break my leg, no one knows I'm here, and by the time someone finds me, I'll be long dead. And if I try to swim to the nearest beach with a bloody leg, I'll be a shark's dinner." Also, I was wearing flip-flops. So I turned around and walked back home.

I belive the human body was made for walking. And this world, whether it consists of exotic places, or just your own neighborhood, is meant to be walked. The next time you're feeling tired, bored, sick, or just not-quite as healthy as you'd like to be, go for a walk. And if you can't find motivation, just think of all the money you'll save on doctor bills, therapy, weight loss product, gas, and vacations.


Wednesday, October 9, 2013

vegetarian recipes for carnivores

The Vegetarian's Dilemma
By: Chef Cristian Feher
www.tampabaychef.com

Yesterday I wrote a really preachy article about the classification of the way we eat foods... And when I read it again this morning, it put me back to sleep! So I decided to re-write it to keep it light and informative.

The Vegetarian’s Dilemma is basically this – how do I have my food and eat it too – how can I eat tasty, energizing, nourishing food that actually tastes good and is good for me?

In this article I'd like to mention that there’s more wrong with processed carbohydrates like pasta, bread, flour, and sugar, than there is with meat. Your body is made of meat (not celery sticks), so unless your religion dictates otherwise, you should include animal protein in your diet – with veggies on the side!

Here are some ways in which I help customers swap out the bad stuff for the good stuff.

Sugar – the best way to avoid the effects of processed sugar is to avoid it altogether. Duh! Obviously, right? A lot of sugar sneaks in through our condiments. Ketchup is a big one, so is BBQ sauce. Try making your own ketchup using some natural honey by mixing 2 cans of tomato paste, ½ cup of white vinegar, 5 tbsp of honey, 1 tbsp each of garlic powder, onion powder, ¼ tsp of all-spice, 2 tsp of sea salt, 2 cups of water.

To make it into BBQ sauce, you can add a few squirts of your favorite hot sauce, and 2 tbsp of molasses (which adds vitamins and minerals)

Mashed Potato and White Rice are great side dishes, but they turn into blood sugar very quickly and are high in calories. For healthy dieters, I always substitute these things with garlic mashed cauliflower. Some people actually like it better than mashed potato  - it actually tastes pretty good, and is very low-carb, and low-calorie. It goes great on the side of a steak!
Simply wash and cut up a head of cauliflower, boil it in salted water for about 20 minutes until it’s soft. Drain, mix with butter, salt, pepper and 3 minced garlic cloves, and mash like regular mashed potato.

Pasta is probably America’s favorite starch, next only to bread. Again, this is a high sugar food that you may want to avoid or eat less often.

I recommend Dreamfields low-carb pasta. It’s found in the pasta section of your grocery store. It looks, tastes and feels like regular pasta, but it’s made in such a way that your body cannot really absorb many of the carbs. 

If you’re really trying to avoid pasta altogether, spaghetti squash (although it tastes nothing like pasta) does shred into spaghetti-like strands, and when mixed with sautéed onion, garlic, tomato, herbs and sea-salt, makes a really enjoyable dish!  Just stick a whole spaghetti squash in the oven at 450 in a baking dish until it browns on both, top and bottom. Take out of oven. Cut in half, remove seeds, and shred the strands with a fork. Sautee with the veggies I mentioned above, or with your own tomato sauce. You can even twirl it like spaghetti with your fork!

I hope you enjoy these little substitutions. And remember that a healthy diet should provide you with energy and furnish your body with the materials needed to build and repair your tissues and organs - animal protein, vegetables, and a very small amount of carbohydrates are ideal.